Blog


concrete5 pages with .html extension in URL

This article might be very specific for one issue and also a bit hacky, but something when you care about your search engine ranking a lot, it might be good idea to look at it.
If you move an existing site to concrete5 which was in the internet for a while, you’ll have a number of websites that point to your site. Depending on the old CMS, if there was one, the URLs might look different than common concrete5 URLs. What choices do you have in such a situation?

  1. Do nothing and wait till Google updates its index, but keep in mind that other websites might never update their links unless someone tells them to do so.
  2. Add a proper 301 redirect that forwards the visitors to the new page. There’s an add-on for this written by ScottC that handles this task very nicely, http://www.concrete5.org/marketplace/addons/url-director/
  3. Make sure the old links still work but changing the concrete5 URLs

In this article we’re going to look at the last option. Before we start, you should know how a page path in concrete5 looks like. You probably do but just in case:

  • /about/
  • /help/faq/

Sometimes the trailing slash is missing but that doesn’t matter in our case. Let’s assume we’ve got an existing non-concrete5 site where the page paths look like this:

  • /about.html
  • /help/faq.html

We’re going to make a few minor changes to make it possible to use this addresses without having to add a redirect. Google nor any visitor will see a change unless they look at the source code of the website.
To achieve this, we need to modify the .htaccess file. If you aren’t familiar with it, in short: It’s an Apache specific file that lets you add certain configurations without having to touch the central configuration file. Before you continue, make sure you’ve got pretty URLs activated, to do this, type “pretty urls” in the intelligent search box in concrete5 and tick the checkbox. If everything works, this change should work as well.

Open the .htaccess file, it might be hidden depending on your FTP client, make sure you’ve enabled to option to see hidden files, and make it look like this:

RewriteEngine On
RewriteBase /
 
RewriteCond %{REQUEST_FILENAME} !-f
RewriteCond %{REQUEST_FILENAME}/index.html !-f
RewriteCond %{REQUEST_FILENAME}/index.php !-f
RewriteRule (.*)\.html$ index.php [E=HTML_URL:/$1/]
 
RewriteCond %{REQUEST_FILENAME} !-f
RewriteCond %{REQUEST_FILENAME}/index.html !-f
RewriteCond %{REQUEST_FILENAME}/index.php !-f
RewriteRule . index.php [L]

The interesting part is the first RewriteRule. It tries to match every request where there’s a “.html” at the end. If it found one, it will extract everything before the “.html”. The “.*” is the rule that matches everything and the brackets around it, make sure it gets saved as a variable, $1 in our case. The E=HTML_URL creates a new variable called REDIRECT_HTML_URL with the value of our path. The first part REDIRECT_ is always added by Apache.

Now that we have an additional variable that hols the correct page path in case there’s a URL ending with “.html”, we have to tell concrete5 to process that new variable. To do this, open config/site.php and insert a new line which defines SERVER_PATH_VARIABLE. Here’s a complete example but note that most values are probably different on your server, it’s just about the last line:

<?php 
define('DB_SERVER', 'localhost');
define('DB_USERNAME', 'codeblog');
define('DB_PASSWORD', 'sdf.sdfDD*çsdf');
define('DB_DATABASE', 'codeblog');
define('BASE_URL', 'http://www.codeblog.ch');
define('DIR_REL', '');
define('PASSWORD_SALT', 'yc8tSlHjZaGpADJ');
define('SERVER_PATH_VARIABLE', 'REDIRECT_HTML_URL');

That’s all it takes, after you’ve made these changes, you can go on an use .html at the end of your URLs.

How that’s it work?

Just for those who’d like to understand why this works. First we’ve made sure there’s a variable that holds the correct path, even if there’s a different ending. We then changed the variable concrete5 uses to find the correct page. If you open /core/concrete/libraries/request.php you can find this code:

public static function get() {
    static $req;
    if (!isset($req) || C5_ENVIRONMENT_ONLY) {
        $path = false;
        if (defined('SERVER_PATH_VARIABLE')) {
            $path = Request::parsePathFromRequest(SERVER_PATH_VARIABLE);
        }
        if (!$path) {
            $path = Request::parsePathFromRequest('PATH_INFO');
        }
        if (!$path) {
            $path = Request::parsePathFromRequest('REDIRECT_URL');
        }
        if (!$path) {
            $path = Request::parsePathFromRequest('REQUEST_URI');
        }
        if (!$path) {
            $path = Request::parsePathFromRequest('ORIG_PATH_INFO');
        }
        if (!$path) {
            $path = Request::parsePathFromRequest('SCRIPT_NAME');
        }
        $req = new Request($path);
    }
    return $req;
}

There’s a check which looks for SERVER_PATH_VARIABLE which is exactly what we’re using. Since concrete5 checks a few more things, we can still use the original page paths like /about.

Generate different URLs in concrete5

Now that we can process requests ending with .html you might wonder what we can do to create such addresses. This requires a bit more hacking but it’s also possible. In most cases where you have a link, concrete5 uses a helper called “Navigation”, here’s the official documentation about it: http://www.concrete5.org/documentation/developers/helpers/navigation/. We can override this helper and add “.html” to the links generated by it.

Create a new file called “navigation.php” in the root directory “helpers”. On a default installation, this directory will be empty. Once you’ve created that file, insert this content:

<?php
defined('C5_EXECUTE') or die('Access Denied.');
class NavigationHelper extends Concrete5_Helper_Navigation {
    public function getLinkToCollection(&$cObj, $appendBaseURL = false, $ignoreUrlRewriting = false) {
        $link = parent::getLinkToCollection($cObj, $appendBaseURL, $ignoreUrlRewriting);
        if (URL_REWRITING && !$ignoreUrlRewriting) {
            $relativeLink = rtrim(str_replace(BASE_URL, '', $link), '/');
            if ($relativeLink != '') {
                $link = rtrim($link, '/') . '.html';
            }
        }
        return $link;
    }
}

This hacky code will change your URLs and thus make sure you’ll have .html in your internal links.

As mentioned at the beginning, this solution is pretty hacky but might work in case you must keep the existing URLs. Let me know if there are things that I’ve missed.


concrete5 beginner’s guide 2nd edition

I’m happy to announce that the second edition of my concrete5 beginner’s guide is available. You can get your copy from Amazon or Packt Publishing.

The book has been updated to match the current version 5.6.1 and thus assures a better experience when following the examples. There was also a lot of valued feedback from new reviewers that has been incorporated in this edition. Thanks a lot to you guys, your feedback was very much appreciated!

Please keep in mind that this is a second edition, not a different book. If you read the first edition and managed to update your knowledge to the latest concrete5 version, there’s not much you’ll learn. The book is mostly aimed at people who want to get started with concrete5 and hesitated to buy the book because it’s a bit out-dated by now.

If there’s anything you’re missing, let me know about it – I’d be happy to publish articles on this blog to fill the gaps which were missed in the book!


concrete5 sitemap like autonav block

A lot of sites have a sitemap page where you can get an overview of all the available content on a site very quickly. However, when this list gets longer, you might want to use some JavaScript to add a tree like structure you can expand and collapse. In this tutorial we’re going to look at the process of building such an autonav block template.

There are plenty of jQuery plugins for this job around as well, but this time we’re going to create everything from scratch. Thanks to jQuery, this is going to take neither a lot of time nor lot of lines of code.
To keep the example as simple as possible, we’re not using any pictures at all. You can surely find a way to improve the layout once you’ve had a closer look at the jQuery code.

Building the Tree Navigation

  1. Create another directory structure for our template blocks/autonav/templates/tree.
  2. Within that directory create view.php, but this time we’ll use a different approach. We only want to change the class name to keep the functionality separated from other autonav blocks on the same page. We also don’t want to copy the default autonav block template to avoid redundant code. We’re going to replace the ul class name on-the-fly:
    <?php 
    $bvt = new BlockViewTemplate($b); 
    $bvt->setBlockCustomTemplate(false);
     
    function nav_tree_callback($buffer) {
    	return str_replace('<ul class="nav">','<ul class="nav-tree">',$buffer);
    }
     
    ob_start("nav_tree_callback");
    include($bvt->getTemplate());
    ob_end_flush();
    ?>
  3. In another file called view.css, you have to place some layout instructions for our tree. The script works without this, but the tree would look a bit misaligned:
    .nav-tree li { list-style-type: none; }
    .nav-tree { margin: 0px; padding: 0px; }
    .nav-tree ul { margin: 0px; padding: 0px 0px 0px 20px; }
    .nav-tree .tree-item-folder { cursor:pointer; }
    .nav-tree .tree-item-type { display:inline-block; width: 10px; }
  4. And finally some jQuery magic in view.js:
    $(document).ready(function() {
      // prepend a span element in front of each link
      $(".nav-tree a").parent().prepend("<span class=
        \"tree-item-type\"></span> ");
     
      // those span element being part of a parent element get a "+"
      $(".nav-tree ul:has(*)").parent().find("> .tree-item-type")
        .text("+").toggleClass("tree-item-folder");
     
      // hide all submenus
      $(".nav-tree ul").hide();
     
      $(".tree-item-folder").click(function() {
        $(this).next().next().slideToggle("fast"); 
      })
    });

Adding tree navigation

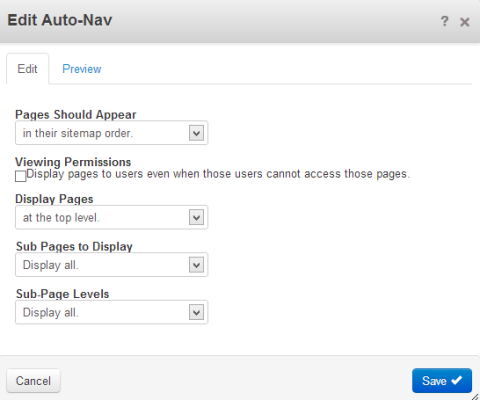
Now that we’ve created the template, we have to use it. To do this, edit the page where you’d like to insert the sitemap / tree. Insert a new autonav block with the following properties:
treemenuautonav

Click on the block after you’ve inserted it and select Custom Template and select the Tree template. Confirm the change and reload the page.

What just happened?

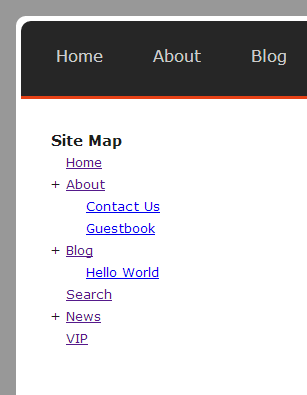
After you’ve created the template and assigned it to your autonav block you’ll have a tree-like navigation which looks as follows:
treemenu

This is another template which doesn’t use any external jQuery libraries at all. Thanks to jQuery, we only needed a few magic lines of code to add a small “plus” sign in front of all pages with subpages. It uses three lines of code to hide the subpages when the user clicks on the “plus” sign, and a small PHP template which includes the default template but replaces the ID to avoid any complications with other navigation blocks on the same page.


concrete5 database list and pagination

If you ever worked with tables in a web application, you’ll probably have had to build some kind of pagination. If you only have very few entries, that’s not necessary but if your database grows, you’ll probably need to display the data in pages of 20 items. In this tutorial, which is aimed at developers knowing concrete5, I’ll show you the use of a helper in concrete5 that does a nice job and helps you a lot in a way you’ll always add a pagination, even if you think you’ll only have 10 entries in the table.

This article contains quite a bit of here, let’s start with an overview of all the elements we’re going to build first:

  • A new package which holds all elements together
  • A “single page” to show you the use of our database item list class
  • Two models, one to manage our data and one which builds a list of it

More about the break!


First Impression about the Play Framework

play framework

I was on my never ending hunt for new technologies and ideas and managed to catch a not completely new, but still young and very interesting framework. It has the simple name Play and can be found here http://www.playframework.com/. In this post I’m going to give you my first impression about my experience. Before I start, let me say that I’ve left the Java boat a while ago. Mostly because a lot of frameworks on the JVM platform have grown big and in my opinion a bit messy. Some J2EE projects I was involved in had almost as many configuration files as source code files. Sure, one can argue that’s always up to the developer but I tend to prefer framework and tools with a clear structure and maybe even some borders to make sure everyone uses the same style and architecture.

Play Framework 1.0 vs. 2.10

A few hours after the Play Framework caught my interest, I was lucky enough to be on a train ride for a few hours and managed to get a hold on the Play Framework Cookbook by Alexander Reelsen. I found it easy to read and follow. He also covered most of the topics I care about: Basic structure, form handling, AJAX, security, REST etc. The only, and big cavet, it’s based on Play 1 while we’re at 2.10 by now. It still helped me to get a first impression about the slickness of the framework. Talking about the version, this is already the first thing that bothers me for a while. I certainly understand that there has to be some kind of evolution sometimes, even if it breaks the backward compatibility but I think it also causes a number of problems. When you search for a tutorial, a module or anything else related to play you’ll mostly find content related to the out dated version 1. I sometimes wished they changed the name because so many things have changed. The whole template system, which was based on Groovy templates, uses Scala by now. I guess some people are going to tell me that I can replace the template system. Well, I can but I don’t want to go a non-standard way, I’d like to stay where I find the most knowledge, the most articles and the most developers. In case you wonder, I tried to replace the Scala templates, it wasn’t difficult.

Luckily, there are some books in the work for Play Framework 2. Two are currently on my watch list: Play for Scala by Peter Hilton, Erik Bakker, Francisco Canedo and Developing on Play Framework 2 by Andy Petrella.

The basics for Play Framework

Since Play follows the MVC pattern very clearly, I felt almost at home when I started with it. Here are some random facts I found when I started to work with Play:

  • It work with the MVC pattern
  • A lot of code has been written using Scala but you can also use Java and maybe other JVM based languages
  • You’ll only need a copy of the Java JDK in addition to the Play Framework
  • There’s a copy of the H2 database included in the framework, no need to install anything in order to get a database into your application
  • Unlike most Java frameworks, you can change a single code file and reload the page in your browser, the framework will automatically compile the code. It takes a few seconds but it’s still quick enough to enjoy this feature. I feel that this could make things messy, but mostly enjoyed it because it makes learning so much easier
  • There’s a console you can use to create a new app (play new yourApp), run an app (play run) and more.
  • It’s stateless and should scale well. I’m saying “should” because I haven’t tried
  • There’s an asset compile which compiles your LESS files to CSS among other resource compilers. You can even build your own!

Performance of the Play Framework

The framework is pretty lean and runs on a built-in Netty webserver. You can run a different setup, for example with a reverse proxy, but when developing, the built-in webserver is very hand.y It looks like there isn’t much overhead, I managed to get 2500 requests per second on a quite complicated template. It’s not really much of a benchmark but as the title says, this article is just a first impression and the first impression about performance is great!

Closing Words about Play Framework

Should you use Play Framework? The worst thing in my opinion is the fact that we have two quite different versions out there. As a beginner you’ll need some time to find the right tutorials from time to time. However, the longer Play 2 is out there, the more tutorials, examples, project and books you’ll find. At some point this should become less of an issue. The fact that a company like Linked.in decided to switch to the Play Framework should also help, more about this in this great article http://engineering.linkedin.com/play/play-framework-linkedin. They posted a great introduction to get the famous Hello World up and running.

In other words: I can recommend the Play Framework and intend to use it for one project we’re working on and others might follow.


concrete5 Themes Book

It’s been quiet on CodeBlog.ch but I wasn’t taking a break from writing, I just spent my writing time on a new book.
You can already order it on amazon http://amzn.to/159G3cG or directly from the publisher: http://www.packtpub.com/creating-concrete5-themes/book.

creating concrete5 themes

The book focuses on concrete5 themes. It’s assumed that you have some experience with HTML and CSS and also know how to read PHP code. Some programmierung experience is recommended!

You’ll be guided through the book by the following sequence:

  • Installation and usage of concrete5 – a few words about the installation as well as the basics to know if you want to work with concrete5 as an end-user
  • A quick look at the architecture of concrete5 – a first glimpse under the hood of concrete5
  • creating themes – the main part
  • Customizing block layouts – a few examples showing you how to change the look of the blocks to get more out of your concrete5 site
  • A small chapter explaining how to change the look for single pages – the 404 or login page among others
  • A short introduction into responsive layouts and how you can use these techniques in concrete5

I hope you’ll find it useful and will build lots of great sites with concrete5!


Compress JavaScripts in Window Explorer

If you worked with JavaScript libraries before, you’ll probably have noticed that most libraries contain a compress file as well. One is called my.library.js while the compressed version is usually called my.library.min.js. This is not a must but when you have a frequently visited site you should consider to compress your JavaScript files. To make it easier and quicker to do this, I’ve added a small shell extension with which you can compress your JavaScript files with pretty much no effort.

Installing YUI Compressor

Yahoo has created an often and well proved compressor which we are going to use. Download the latest version from this page: http://yuilibrary.com/download/yuicompressor/. If you extract the file, you’ll see a bunch of directories and files, but only the one in the build directory is actually required. Move the yuicompressor-x.y.z.jar into a directory of your choice. I used C:\Program Files\YuiCompressor as I thought it’s kind of an application and belongs in the program files, but feel free to use any other directory.

Creating Batch File to call Yui Compressor

We are going to create a small little wrapper which will call the YUI compressor. For this, create a new file called compress.bat in the same directory. Mine looks like this:

In this file, add the following content:

1
java -jar "%~dp0\yuicompressor-2.4.7.jar" %1 -o %~n1.min%~x1

Make sure you are using the correct version (2.4.7 at the time of writing). As you can also see, the YUI Compressor uses Java. If it’s not already installed, install either the Java JRE or Java SDK http://java.com/en/download/index.jsp.

Adding Shell Extension

We need some new registry entries to call our wrapper directly from the Windows explorer. Hit “Windows + R” and enter “regedit” to open the registry editor. Please note: Changes in the registry editor have to be done very carefully! Doing the wrong changes in the registry can break your Windows installation!

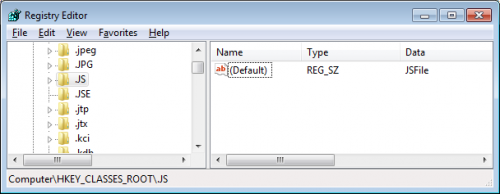
In the left pane, select HKEY_CLASSES_ROOT\.js and look for the value in the right pane. The value we need is JSFile in the following screenshot:

In HKEY_CLASSES_ROOT we have to find the value we just found. In that folder you should find another key called “shell”.

  1. Right click on “shell”
  2. Select “New – Key”
  3. Enter “compress” and confirm it
  4. Select the newly created key
  5. Open the default value on the right and enter “Compress”
  6. Right click on the new folder “compress” in the right panel and select “New – Key”
  7. Enter “Command” and enter the following value: “”C:\Program Files\YuiCompressor\compress.bat” “%1″”

Adjust the path in the last step according to the directory where you installed the YUI compressor.
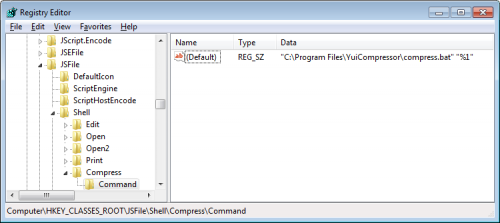
If you’re done, you should have the following structure:

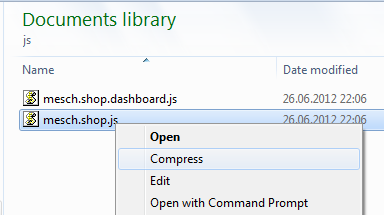
When you now go to your Windows explorer and right click a file with the extension .js you’ll see a new entry called “Compress”. Click on it and you’ll find a new, compressed, JavaScript in the same directory:

No more excuses not to compress your JavaScript files!


Share content across site in concrete5

If you worked with concrete5 before you probably know that there’s an in-site editing system where you can place a different kinds of blocks in areas. Usually a page has several areas and your site probably has several pages. This concept might have been a bit uncommon but once you’re used to it, it’s rather powerful and easy to understand as it allows you to edit your site in a layout more or less identical to the layout the site has to visitors.

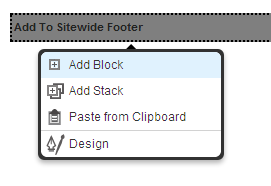
Placing content in a block works fine but if you wanted to have the same content on several pages it’s going to be a bit tricky. Assume you want to put a certain content in the footer of every page. There used to be a feature called “Scrapbook” which has been replaced by “Stacks”. You can find more information about this on the following page: http://www.concrete5.org/documentation/how-tos/developers/concrete5-5.5-stacks-vs.-scrapbooks/. This is one option you can use, but there’s another one where you can stay on the page you’re editing while amending sitewide content (when editing a “Stack” you’re being redirected to a dashboard page).


Improved PHP error reporting

Unfortunately I’m still not able to write thousands of lines without making a mistake, I’m still trying of course! In most situations you’ll get enough information from PHP to fix the problem quickly but sometimes you have to navigate through a bunch of files until you’ve found the origin of the problem.

This can be annoying and time consuming.

Luckily Joseph Lenton wrote a rather nice tool which shows you more information and it’s also very easy to use. There’s no PHP module involved, no installed required like XDebug.

Get the source of php_error.php from this page: https://github.com/JosephLenton/PHP-Error.
After that all you need to do is to include this at the top of the first file you’re working with:

require( 'php_error.php' );
\php_error\reportErrors();

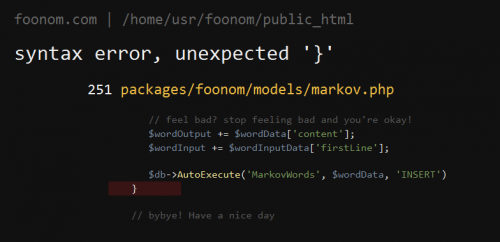
After that, you’ll see a nice output like this if you make a mistake:

It might happen that you’re getting a bunch of stuff which you don’t care about. That’s probably because you have some warning or notices about deprecated functions. You can either fix them or if you’re lazy, change the error_reporting like this:

require( 'php_error.php' );
 
$options = array(
       'snippet_num_lines' => 10,
       'error_reporting_off' => 0,
       'error_reporting_on' => E_ERROR | E_WARNING | E_PARSE
);
\php_error\reportErrors( $options );

You can find more options here: https://github.com/JosephLenton/PHP-Error/wiki/Options.

Have fun!


No Network in Debian after Cloning with VirtualBox

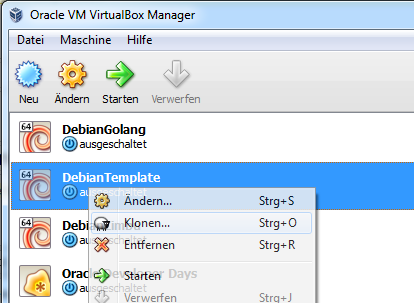
I often work with virtual Debian instances to test new stuff. In order to reduce the likelihood that another test I’ve run before interferes with the new test, I clone them. I’ve installed a base system which runs using VirtualBox. Whenever I want to test something new I just clone it with this neat little function:

Unfortunately there’s one little change you have to make…