If you ever worked with tables in a web application, you’ll probably have had to build some kind of pagination. If you only have very few entries, that’s not necessary but if your database grows, you’ll probably need to display the data in pages of 20 items. In this tutorial, which is aimed at developers knowing concrete5, I’ll show you the use of a helper in concrete5 that does a nice job and helps you a lot in a way you’ll always add a pagination, even if you think you’ll only have 10 entries in the table.
This article contains quite a bit of here, let’s start with an overview of all the elements we’re going to build first:
- A new package which holds all elements together
- A “single page” to show you the use of our database item list class
- Two models, one to manage our data and one which builds a list of it
More about the break!
Package controller for database item list
As mentioned at the beginning, we’re wrapping everything in a nice package which will have the result, that you only need to copy one directory and install it with one click in the dashboard.
To start with it, create a new directory called “codeblog_database_itemlist” in the directory “packages” in the root of your concrete5 site. Within that directory, create a new file called “controller.php” and put the following content in it:
<?php defined('C5_EXECUTE') or die('Access Denied.'); class CodeblogDatabaseItemlistPackage extends Package { protected $pkgHandle = 'codeblog_database_itemlist'; protected $appVersionRequired = '5.6.1'; protected $pkgVersion = '0.0.1'; protected $package; public function getPackageName() { return t("Codeblog Database Itemlist"); } public function getPackageDescription() { return t("Installs the Codeblog Database Itemlist example package."); } private function addSinglePage($path, $name, $description = '', $icon = '') { Loader::model('single_page'); $page = Page::getByPath($path); if (is_object($page) && $page->getCollectionID() > 0) { return; } $sp = SinglePage::add($path, $this->package); $sp->update(array('cName' => $name, 'cDescription' => $description)); if ($icon != '') { $sp->setAttribute('icon_dashboard', $icon); } } public function install() { $this->package = parent::install(); $db = Loader::db(); $this->addSinglePage('/codeblog_database_itemlist', t('Database Item List'), t('Database Item List Testpage')); } public function on_start() { /** * Register our models to make them available to auto loading * and therefore remove the need to call Loader::model everytime * we need them */ $classes = array( 'Mountain' => array('model', 'mountain', 'codeblog_database_itemlist'), 'MountainList' => array('model', 'mountain_list', 'codeblog_database_itemlist') ); Loader::registerAutoload($classes); } } |
Let’s quickly go through the content of this file.
- It starts with the mandatory package information part you’ll find in every concrete5 package, nothing special there
- There’s a method called “addSinglePage” which checks if the page is already installed and does nothing if it is, and also has an option to specify in icon in case you want to add the page somewhere in the dashboard. Checking if the single page already exists has the benefit that it makes it easy for you to use the same method in the upgrade method in case you want to add more pages in a future version.
- Nothing out of the ordinary in the install method, we call the parent method to make sure concrete5 actually installs the package and simply call our new “addSinglePage” method to add our test page
- The “on_start” contains something which doesn’t exist for very long. If you ever worked with concrete5 version 5.3.x or 5.4.x you’ll have used something like “Loader::model”. This method still exists, but if you want, you can avoid it by registering your classes on the “on_start” method in the package controller. Once you’ve done that, you can simply use the name specified in the array key (Mountain and MountainList in our example) and use that to get access to your classes
Since we want to play with some data, we need to create a file called “db.xml” which will create our table structure during the installation of the package. Create a file called “db.xml” in our package’s directory “codeblog_database_itemlist” with this content:
<?xml version="1.0"?> <schema version="0.3"> <table name="CodeblogMountains"> <field name="mountainID" type="I" size="11"> <key/> <autoincrement/> <unsigned/> </field> <field name="mountainHeight" type="I" size="11"/> <field name="mountainName" type="C" size="50"/> </table> </schema> |
Now that we have a package controller, we need to create the files that it needs to properly install the package. We’ll continue with the two main files for this article, the two models to manage our data. In your package directory “codeblog_database_itemlist”, create a new directory “models” and within that directory a file called “mountain.php”. Here’s the complete code of it:
<?php defined('C5_EXECUTE') or die('Access Denied.'); class Mountain extends Object { protected $mountainID; public function __construct($mountainID, $row = null) { $this->mountainID = $mountainID; if ($row == null) { $db = Loader::db(); $row = $db->GetRow('SELECT * FROM CodeblogMountains WHERE mountainID=?', array($mountainID)); } $this->setPropertiesFromArray($row); } public function getMountainID() { return $this->mountainID; } public function getMountainName() { return $this->mountainName; } public function getMountainHeight() { return $this->mountainHeight; } public function update($data) { $db = Loader::db(); $db->AutoExecute('CodeblogMountains', $data, 'UPDATE', "mountainID='{$this->mountainID}'"); } public static function add($data) { $db = Loader::db(); $db->AutoExecute('CodeblogMountains', $data, 'INSERT'); return new Mountain($db->Insert_ID(), $data); } public function remove() { $db = Loader::db(); $db->Execute('DELETE FROM CodeblogMountains WHERE mountainID=?', array($this->mountainID)); } } |
The code isn’t long but there are a few things we have to have a closer look at, let’s go through this step by step.
- We start with our new class “Mountain” which extends “Object”. We need this super class to get access to a method called “setPropertiesFromArray”, more about that in the next few steps.
- Our constructor has two parameters, the second one is optional. If you only specify the first parameter, the mountain ID, the code will execute a SQL query to fetch the data from the database. However, if you already have all the data in an array you can pass this on to the constructor in the second parameter and avoid this SQL query. Something that often doesn’t matter but if you run this code on a big table, this can have a huge performance impact.
- In the same method, we’re called “$this->setPropertiesFromArray($row)”. No matter from where we got the content of $row, we’re going to use it to create properties in the new object.
- There are a few methods to access the properties that have been created by “setPropertiesFromArray” like getMountainName or getMountainHeight. If you need more fields, make sure you create more methods like these to access your properties and also add the fields in the SQL query in the constructor
- The “add” method uses a method called “AutoExecute”. We could have built a “INSERT INTO” statement manually, but “AutoExecute” is nice because you can simply add more entries to your array and it will automatically map those to the query. If you have an array like: “array(‘mountainName’ => ‘Giswilerstock’)” and use it in combination with “AutoExecute”, you’ll get this “INSERT INTO yourTable (mountainName) VALUES (‘Giswilerstock’)”. More about it here: http://phplens.com/lens/adodb/docs-adodb.htm#autoexecute.
Next, create another file called “mountain_list.php” in the same directory “models” with the following content:
<?php defined('C5_EXECUTE') or die('Access Denied.'); class MountainList extends DatabaseItemList { private $queryCreated; protected function setBaseQuery() { $this->setQuery('SELECT mountainID, mountainName, mountainHeight FROM CodeblogMountains'); } protected function createQuery() { if (!$this->queryCreated) { $this->setBaseQuery(); $this->queryCreated = 1; } } public function get($itemsToGet = 0, $offset = 0) { $mountains = array(); $this->createQuery(); $r = parent::get($itemsToGet, $offset); foreach ($r as $row) { $mountains[] = new Mountain($row['mountainID'], $row); } return $mountains; } public function filterByHeight($value, $comparison = '=') { $this->filter('mountainHeight', $value, $comparison); } public function sortByMountainName($order = 'asc') { $this->sortBy('mountainName', $order); } public function getTotal() { $this->createQuery(); return parent::getTotal(); } } |
This is the file where most of the magic happen. Let’s go through the most important things step by step again:
- We derive our class from “DatabaseItemList”, the concrete5 core class that helps us with pagination and a lot more
- “setBaseQuery” is a method you have to override if you build your own “DatabaseItemList” class, this is the base where you specify how to get the list you need.
- Don’t worry about “createQuery”, it looks the same in most of the item list classes you’ll build. It only makes sure we don’t let the computer spend unnecessary time to build the same query several times.
- The “get” method is always a bit different. The part with “createQuery” as well as “parent::get” usually don’t change but in the foreach loop, we’ve got this code “new Mountain($row[‘mountainID’], $row)”. As mentioned a bit earlier, we can create a new “Mountain” object without the need to run another SQL query by passing all the data in the second parameter. This is exactly what we’re doing here since we already fetched all the data we need in the SQL query specified in “setBaseQuery”. This means that we can create a list of object with only one SQL query, the way it’s supposed to be.
- The “filterByHeight” shows you how you can add custom filter methods.
- The same goes for “sortByMountainName” it’s of course not about filtering but rather sorting.
- “getTotal” is another method that stays mostly the same, nothing to worry about.
Before we build our example page, let’s quickly create the CSS used in that page first. To do this, create a directory called “css” in your package’s directory “codebog_database_itemlist”. Within that directory, create a new file called “mountain_style.css” with this content:
.mountain-style table { border: 1px solid #ccc; } .mountain-style th { font-weight: bold; } .mountain-style td, .mountain-style th { padding: 5px; } |
Now that we have our package installer as well as the two model files, we can create our example page. Let’s create a new folder called “controllers” in our package directory “codeblog_database_itemlist”. Within that directory, create a new file called “codeblog_database_itemlist.php” and put the following content in it:
<?php defined('C5_EXECUTE') or die('Access Denied.'); class CodeblogDatabaseItemlistController extends Controller { public function view() { $ml = new MountainList(); $ml->setItemsPerPage(5); $ml->sortByMountainName(); $ml->filterByHeight(4000, '>'); $html = Loader::helper('html'); $this->addHeaderItem($html->css('mountain_style.css', 'codeblog_database_itemlist')); $this->set('mountains', $ml->getPage()); $this->set('mountainsPagination', $ml->displayPaging(Loader::helper('navigation')->getLinkToCollection($currentPage), true)); } public function add() { $th = Loader::helper('text'); $data = array( 'mountainName' => $th->sanitize($this->post('mountainName')), 'mountainHeight' => $th->sanitize($this->post('mountainHeight')) ); Mountain::add($data); $this->set('message', t('Mountain added')); $this->view(); } public function remove($mountainID) { $mountain = new Mountain(intval($mountainID)); $mountain->remove(); $this->set('message', t('Mountain removed')); $this->view(); } } |
Like before, let’s have a look at the most interesting parts of this file:
- The class name is always determined by the directory name. These are the rules to create the correct class name:
- It starts with a capital letter
- After every underscore, there’s another capital letter
- Underscores are removed
- At the end, there’s the word “Controller”
- The “view” method is called when our single page is rendered by using an URL like “/codeblog_database_itemlist”.
- In the “view” method, we instantiate our “MountainList” class, call the method “setItemsPerPage” from the super class to define that we only want to see 5 items per page.
- We call our custom sort method “sortByMountainName”.
- We then call our custom filter function “filterByHeight” to hide all mountains with a height less than 4000 meters.
- We then use “$this->addHeaderItem” to include our CSS in the head of the HTML document created by concrete5.
- Second before last, we call “$ml->getPage()” to get 5 items from our list.
- On the last line in the “view” method, we call $ml->displayPaging” to get the code for the pagination links.
- Please note that we use “$this->set” to forward the content of these variables and return values to the output file which we’ll create after this file.
- The “add” method creates an array which will be used by “AutoExecute” to add a new row to our table. We’re also using the “sanitize” method to make sure no one can run an SQL injection on our site.
- In the “remove” method we instantiate the “Mountain” class without the second parameter. This will execute an SQL query but since we don’t have the necessary data anymore, this is okay. We usually also don’t remove thousands of entries using this method.
There’s one more file we have to create, in your package directory “codeblog_database_itemlist”, create a new directory called “single_pages” and within that directory a new file called “codeblog_database_itemlist.php” with this content:
<div class="mountain-style">

    <?php
    if (isset($message)) {
        echo "<b>{$message}</b>";
    }
    ?>

    <table>
        <thead>
            <tr>
                <th><?php echo t('Name') ?></th>
                <th><?php echo t('Height') ?></th>
                <th></th>
            </tr>
        </thead>
        <tbody>
            <?php foreach ($mountains as $mountain) { ?>
                <tr>
                    <td><?php echo $mountain->getMountainName() ?></td>
                    <td><?php echo $mountain->getMountainHeight() ?></td>
                    <td><a href="<?php echo $this->action('remove', $mountain->getMountainID()) ?>"><?php echo t('remove') ?></a></td>
                </tr>
            <?php } ?>
        </tbody>
        <tfoot>
            <tr>
                <td colspan="3">
                    <?php echo $mountainsPagination ?>
                </td>
            </tr>
            <tr>
                <form method="post" action="<?php echo $this->action('add') ?>">
                    <td><input type="text" name="mountainName" value=""/></td>
                    <td><input type="text" name="mountainHeight" value=""/></td>
                    <td><input type="submit" value="<?php echo t('Add Mountain') ?>"/></td>
                </form>
            </tr>
        </tfoot>
    </table>

</div> |
Here’s the last step by step list in this article:
- There’s a check for “$message” which we use to display info messages if table entries have been added or removed.
- The foreach loop goes through all the mountains in the current page, not more than 5 in our example.
- Within the loop, we’ve got this code “$this->action(‘remove’, $mountain->getMountainID())”. This will link to the “remove” method of our single page controller and pass the result of “$mountain->getMountainID()” to it.
- A few lines further down, we’ve got this “echo $mountainsPagination”. This will print a few links you can use to switch between all the available pages in the list. There’s nothing you have to do more, the DatabaseItemList class handles all of that internally!
- At the end, there’s a form where we use the “action” method again to forward it to the “add” method of our single page controller to add a new entry.
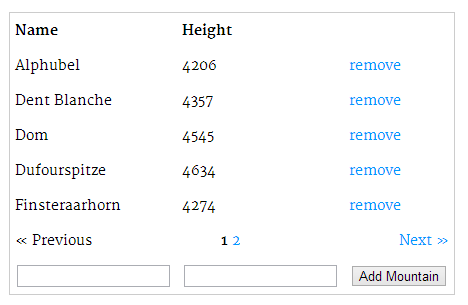
That’s it! You can now install the package and open the page /codeblog_database_itemlist to play around with it. The result should look like this:
Where to go from here
If you had any troubles with this tutorial, you can find the latest code here: https://github.com/Remo/codeblog/tree/master/codeblog_database_itemlist
You still haven’t had enough about item list? Here are a few links to get more information:
- The concrete5 core class “PageList” is a great example which more functions than this tutorials has shown you: https://github.com/concrete5/concrete5/blob/master/web/concrete/core/models/page_list.php
- The base class of your list might show you some insights as well: https://github.com/concrete5/concrete5/blob/master/web/concrete/core/libraries/database_item_list.php
- The official documentation contains a few words about these item lists too, check this page for more information: http://www.concrete5.org/documentation/developers/pages/searching-and-filtering
12 Comments
Hi Remo,
Echt lehrreich. Das ist jedenfalls ein guter Einstieg in der Materie der Package-Entwicklung. Es hat 45 Minuten gedauert und ist problemlos gelaufen.
Es wäre didaktisch genial in weiteren Schritten zu sehen, wie daraus ein konfigurierbarer Block gemacht werden kann. Ein Block wo man z.B. die Tabelle, die anzuzeigende Felder und die Anzahl der Einträgen bestimmen Kann.
Ist sowas denkbar?
Klar, sowas ist machbar! Werde das mal auf meine Todo Liste nehmen. Wird aber vermutlich eine Weile dauern!
Hi Remo,
Didn’t have the time to run through all of this yet, but thought I’d let you know that this github repo does not exist:
https://github.com/Remo/codeblog-database-itemlist
You probably meant here:
https://github.com/Remo/codeblog/tree/master/codeblog_database_itemlist
FYI 🙂
John
Thanks John!
I’m starting to feel bad about all my mistakes you discover 😉
Awesome! Man, I was trying to figure out how the registerAutoload() method wanted the data; this is perfect and works like a charm. You’re a champ!
Hi Remo thx for this tutorial
Very Help me
But i have question , How about update function ?
In model you put update function
i have try to make update function, but failed because crash with the construct
Can you teach me, how to make update function with this tutorial
Thx before
What do you mean by crash in the constructor? Got some code I could analyse? Without having tried it, I think something like this should work:
Hi Reno – thanks for this tutorial.
I am venturing into working with custom tables, so this is great.
I grabbed your code example from Github and installed the package on a development site…
But here comes the interesting part. I don’t se anything in my frontend, but if I check the source code, all content is there (name, height and content from the database table). It’s just not showing in the frontend.
Do you have any idea as to why?
Hi Tilde
my bad, I left some old code in there!
If you check this line: https://github.com/Remo/codeblog/blob/master/codeblog_database_itemlist/controllers/codeblog_database_itemlist.php#L11
You can see that I show how you can filter for a certain field. With the current code, only mountains higher than 4000 will be shown. The last time I was in Denmark I couldn’t see anything that was even close to that height 😉 If you try with something higher, does the mountain appear? Or simply remove that line I’ve linked above.
I hope that helps!
Remo
Please create a simple demo with search option.
Sorry, too busy to work on my least popular tutorial. But don’t forget, concrete5 is open source, you already have lots of examples, here’s one: https://github.com/concrete5/concrete5/blob/master/web/concrete/core/controllers/single_pages/dashboard/sitemap/search.php
Yeah… thanks for reply. I found solution by myself http://www.concrete5.org/community/forums/customizing_c5/problem-occurred-during-pagination/#582233
Once again thanks for the wonderful beginner tutorial for database list and pagination