JavaScript (6)


Group Markers in Google Map with Gmaps Marker Clusterer

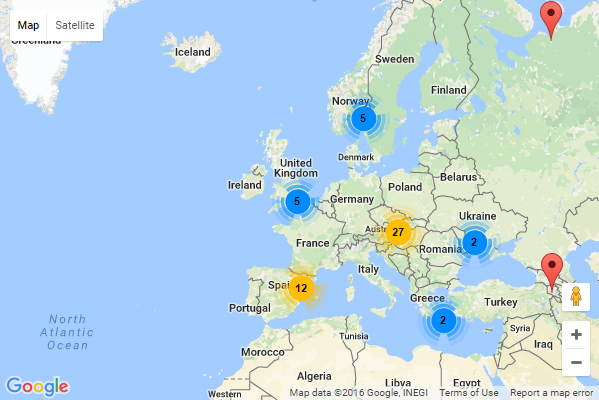
If you have a map with a lot of markers you’ll eventually have a hard time to see all the maps, especially if you zoom out. There’s a google library called “Js Marker Clusterer” which helps out, it simply builds clusters of markers close together. Unfortunately it’s not maintained anymore, but there aren’t many good alternatives. That’s why we’ve decided to join our effort and create a fork under a new organization. We couldn’t use the same name but wanted to stay close to it’s original name. Because of that we’ve decided to go with Gmaps Marker Clusterer. It’s an attempt to avoid having too many forks which eventually die because of missing interest. Right now we are two contributors, but we are obviously interested in getting more help. You can find the github page here https://github.com/gmaps-marker-clusterer/gmaps-marker-clusterer and the documentation (work in progress) here: https://gmaps-marker-clusterer.github.io/gmaps-marker-clusterer/

Here’s a simple example showing you how to create a google map with clusters. It assumes you have a global array called “data”, it can be found here https://gmaps-marker-clusterer.github.io/gmaps-marker-clusterer/assets/js/data.json:

var markers = [];
for (var i = 0; i < 100; i++) {
    var dataPhoto = data.photos[i];
    var latLng = new google.maps.LatLng(dataPhoto.latitude,
        dataPhoto.longitude);
    var marker = new google.maps.Marker({
    position: latLng
    });
    markers.push(marker);
}
 
var options = {
    imagePath: 'https://raw.githubusercontent.com/gmaps-marker-clusterer/gmaps-marker-clusterer/master/images/m'
};
 
var markerCluster = new MarkerClusterer(map, markers, options);

As you can see we basically just create our markers through MarkerClusterer and this will then add all of them in a nice way to the already existing map object. A complete example with google maps (you might have to set your own key after &key=) would then look like this:

<style type="text/css">
#map {
    width: 600px;
    height: 400px;
    max-width: 100%;
}
</style>
 
<div id="map-container"><div id="map"></div></div>
<script>
    function initialize() {
        var center = new google.maps.LatLng(51.5074, 0.1278);
 
        var map = new google.maps.Map(document.getElementById('map'), {
          zoom: 3,
          center: center,
          mapTypeId: google.maps.MapTypeId.ROADMAP
        });
 
        var markers = [];
        for (var i = 0; i < 100; i++) {
          var dataPhoto = data.photos[i];
          var latLng = new google.maps.LatLng(dataPhoto.latitude,
              dataPhoto.longitude);
          var marker = new google.maps.Marker({
            position: latLng
          });
          markers.push(marker);
        }
 
        var options = {
            imagePath: 'https://gmaps-marker-clusterer.github.io/gmaps-marker-clusterer/assets/images/m'
        };
 
        var markerCluster = new MarkerClusterer(map, markers, options);
    }
</script>
 
<script src="markerclusterer.js"></script>
<script src="data.json"></script>
<script async defer src="https://maps.googleapis.com/maps/api/js?callback=initialize&key="></script>

You can find a working example here https://gmaps-marker-clusterer.github.io/gmaps-marker-clusterer/example-simple/. A real life example can be found here, a Swiss site showing you interesting places to spend your time in the nature with your kids, playgrounds, fireplaces and more: https://www.freizeitplatz.ch/


VueJS2 UI test – Quasar Framework

After I published my article about VueStrap things have changed a bit. We now have the awesome version 2 of VueJS and obviously we need to build a UI with it at some point. I took that as a reason to have another look at the UI libraries.

I was able to find a few frameworks for VueJS2. I managed to find three and had a quick look at all of them

  • http://vuikit.github.io/vuikit/ Feel clean and simple. Button checkboxes where only the button border changes feels a bit too subtle to me, but overall it looks pretty good.
  • http://quasar-framework.org/ Seems to have a focus on mobile devices, but works on a desktop too. Extensive documentation, great first impression.
  • http://element.eleme.io/ Unfortunately this is only in Chinese, but some parts are in two languages, that’s good enough to find the component you need. Looks pretty solid too, but seems to have less components than Quasar.

I’ve decided to give Quasar a go as it feels very complete and solid.

Getting started with Quasar Framework.

There’s not much to explain, the documentation is up to date and easy to understand. If you need more details, use the author’s documentation: http://quasar-framework.org/guide/index.html

Here’s what I did:

npm install -g quasar-cli
quasar init quasar-test
cd quasar-test
npm install

No problem there, everything installed fine. It seems like there are two different themes. The default material theme:

quasar dev

A second one called iOS

quasar dev ios

Let’s see how it looks:

quasar

Awesome, material and iOS style in a second!

Adding a new Quasar framework component

The first screen is made of the index.vue found in src/components. Let’s try to add a fixed button like shown here: http://quasar-framework.org/components/floating-action-buttons.html

When I tried to remove the logo I received an error:

chrome_2016-10-25_09-49-03

How awesome is this, it helps me to write nicely formatted code and even tells me right in the browser with live reload. Let’s remove the trailing spaces and give it another try. Spaces removed and it works, no issues at all!

I like tree, the green ones, but also the ones on my screen. Let’s have a look at the documentation: http://quasar-framework.org/components/tree.html

Copy the model data to our index.vue and add the element to the template. Again, everything works smoothly:

chrome_2016-10-25_09-53-48

I’m impressed with Quasar Framework! The first impression lasts! I played around with a few more things and whatever I do work well. There’s even a live reload plugin for Android. All those features at this quality is amazing.


Vue.JS UI Test / VueStrap

I recently became quite fond of Vue.JS. It feels like a simpler version of AngularJS 1 / Angular 2 and so far came with everything I was looking for. It took me a while to get everything up and running, npm with all its dependencies, multiple versions and more alpha than beta libraries it can be a bit annoying, but once things are running smooth, it’s quite job. Naturally I need to have some kind of graphical interface.

There’s a great list of Vue.JS libraries, always a good start if you need something: https://github.com/vuejs/awesome-vue

As I’m pretty experiences with bootstrap, I just felt that I should go with something not completely new to me. With currently 2364 stars and a lot of activity just a few hours ago the project seems to be very much alive. I was also happy to see 45 different contributors, the majority of the work done by fewer people though. Here’s the project’s home: https://github.com/yuche/vue-strap.

Getting started

First we have to create a Vue.JS project. Assuming you’ve got node and npm installed, you can install the vue-cli tools to do that:

npm install -g vue-cli

Once you’ve got that installed, you can create a simple project by running this command:

vue init webpack-simple#1.0 vue-strap-test

Please note that I’ve specify version 1 as version 2 isn’t stable yet. Once the project has been created we have to install the npm modules.

cd vue-strap-test
npm install

Now that we’ve got our empty Vue.JS project we have to add VueStrap. We can easily do that by running this command

npm install vue-strap bootstrap style-loader

Please note that I’m also installed bootstrap as we require its CSS and style-loader so that we can easily embed bootstrap from our component. More about that later.

Everything is installed, let’s open src/App.vue and add our components. First we add something to the template section, right after the h1 element:

<alert type="success">
   Success!
</alert>

In the script section we also have to import two files, our VueStrap component and of course bootstrap:

import { alert } from 'vue-strap'
import 'bootstrap/dist/css/bootstrap.css'

And then we also need to make the imported component available by adding these lines:

components: {
   alert
}

The complete component looks like the file shown here https://github.com/ortic/vue.js-ui-test/blob/master/vue-strap-test/src/App.vue

If you then go back to your terminal, you can simply type npm run dev and then open your browser at http://localhost:8080
The nice thing about running dev is that it automatically reload if you change your code. Here are two more changes to the component to add more bootstrap features:

If everything worked, you should some something like this:

chrome_2016-09-20_17-19-45

Conclusion about VueStrap

Being Bootstrap makes it rather powerful and very familiar to lots of developers, that’s certainly a big plus. I somehow like that they implemented the whole JavaScript part using Vue.JS, that makes it lighter and more Vue.JS like, but reinventing this part might cause some new bugs to show up too. It seems like there are still a few bugs which I can find in very little time. My first attempt with browserify on top of an existing project lead me to this problem. https://github.com/yuche/vue-strap/issues/198. In this attempt, the popover component didn’t seem to work. The DOM gets changed, but the CSS property display is still set to none, here’s the commit https://github.com/ortic/vue.js-ui-test/commit/a3fab52f9195d90995ada87d3e031a30575888ea.

While it seems to be pretty cool, I’m not convinced it’s stable enough to be used in a large scale project unless you’re okay with fixing a few things yourself. It’s free after all and the code isn’t too difficult to understand once you’ve got a hang of Vue.JS. I’ll keep on testing other frameworks to narrow things a bit down.


Compress JavaScripts in Window Explorer

If you worked with JavaScript libraries before, you’ll probably have noticed that most libraries contain a compress file as well. One is called my.library.js while the compressed version is usually called my.library.min.js. This is not a must but when you have a frequently visited site you should consider to compress your JavaScript files. To make it easier and quicker to do this, I’ve added a small shell extension with which you can compress your JavaScript files with pretty much no effort.

Installing YUI Compressor

Yahoo has created an often and well proved compressor which we are going to use. Download the latest version from this page: http://yuilibrary.com/download/yuicompressor/. If you extract the file, you’ll see a bunch of directories and files, but only the one in the build directory is actually required. Move the yuicompressor-x.y.z.jar into a directory of your choice. I used C:\Program Files\YuiCompressor as I thought it’s kind of an application and belongs in the program files, but feel free to use any other directory.

Creating Batch File to call Yui Compressor

We are going to create a small little wrapper which will call the YUI compressor. For this, create a new file called compress.bat in the same directory. Mine looks like this:

In this file, add the following content:

1
java -jar "%~dp0\yuicompressor-2.4.7.jar" %1 -o %~n1.min%~x1

Make sure you are using the correct version (2.4.7 at the time of writing). As you can also see, the YUI Compressor uses Java. If it’s not already installed, install either the Java JRE or Java SDK http://java.com/en/download/index.jsp.

Adding Shell Extension

We need some new registry entries to call our wrapper directly from the Windows explorer. Hit “Windows + R” and enter “regedit” to open the registry editor. Please note: Changes in the registry editor have to be done very carefully! Doing the wrong changes in the registry can break your Windows installation!

In the left pane, select HKEY_CLASSES_ROOT\.js and look for the value in the right pane. The value we need is JSFile in the following screenshot:

In HKEY_CLASSES_ROOT we have to find the value we just found. In that folder you should find another key called “shell”.

  1. Right click on “shell”
  2. Select “New – Key”
  3. Enter “compress” and confirm it
  4. Select the newly created key
  5. Open the default value on the right and enter “Compress”
  6. Right click on the new folder “compress” in the right panel and select “New – Key”
  7. Enter “Command” and enter the following value: “”C:\Program Files\YuiCompressor\compress.bat” “%1″”

Adjust the path in the last step according to the directory where you installed the YUI compressor.
If you’re done, you should have the following structure:

When you now go to your Windows explorer and right click a file with the extension .js you’ll see a new entry called “Compress”. Click on it and you’ll find a new, compressed, JavaScript in the same directory:

No more excuses not to compress your JavaScript files!


concrete5 SooperFish drop down navigation

Creating a drop down navigation is an old technique by now but it’s still used in a lot of cases to hide parts of a navigation. In addition to the plain CSS menu I wrote more than 2 years ago, I decided to write a new tutorial which uses JavaScript as well. You might ask why: Avoiding JavaScript is nice but creating something as complex as a drop down navigation without any JavaScript leads to a few ugly work arounds. You’ll also have some difficulties to add a fade out and fade in effect unless you’re using CSS3 which isn’t well supported yet.

But at the end it’s up to you, both solutions can work just fine!

Using SooperFish is also a bit easier for us, you’ll see at the end of the tutorial how little code you needed.
At the end your navigation can look like this:


concrete5 – AJAX Add-on to display File Download Statistics

Today’s article is about concrete5 again after a long time without anything about concrete5 on codeblog.ch. The example we’re going to look at takes a few ideas and code snippets from my book about concrete5.

If you ever had a closer look at the file manager you’ve probably seen that if you open the file properties, you can see a small statistics about the downloads of a file. This is quite nice but what if you wanted to see how many file downloads there are in total? Right now, there’s no such report available in concrete5 which is why we’re going to build the first part of such an addon.

It will use some AJAX to switch between different views, allowing us to extend it even further in the future. At the end you’ll have an additional page in the reports section like this: