Concrete5 (35)


concrete5 – AJAX Add-on to display File Download Statistics

Today’s article is about concrete5 again after a long time without anything about concrete5 on codeblog.ch. The example we’re going to look at takes a few ideas and code snippets from my book about concrete5.

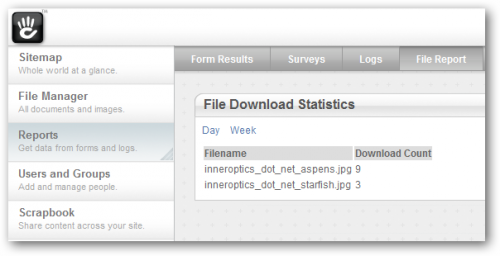
If you ever had a closer look at the file manager you’ve probably seen that if you open the file properties, you can see a small statistics about the downloads of a file. This is quite nice but what if you wanted to see how many file downloads there are in total? Right now, there’s no such report available in concrete5 which is why we’re going to build the first part of such an addon.

It will use some AJAX to switch between different views, allowing us to extend it even further in the future. At the end you’ll have an additional page in the reports section like this:

concrete5 – Performance Improvement with Block-Cache

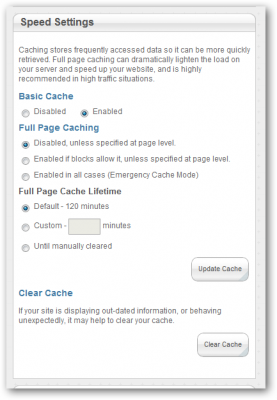
There has been an interesting feature in concrete5 which can improve your sites performance noticeably. If you log in to your site and look at the Sitewide Settings screen, you can see this box:

concrete5 full page cache settings

As already mentioned on the screenshot, these settings improve the performance by caching various outputs generated by blocks. In order to get the most out of your own blocks, you should look into this feature a bit closer. Think about this: How does concrete5 know that the output of a block can be cached? It can’t!

Block Cache Options

If you already created your own blocks in the past, your should be familiar with the BlockController. You probably also specified properties like $btTable and $btInterfaceWidth. Now, there are a few more properties you can set. Look at the following start of a BlockController:

class MusicBlockController extends BlockController {
   protected $btInterfaceWidth = 450;
   protected $btInterfaceHeight = 430;
   protected $btTable = 'btMusicPlayer';
   protected $btCacheBlockRecord = true;
   protected $btCacheBlockOutput = true;
   protected $btCacheBlockOutputOnPost = true;
   protected $btCacheBlockOutputForRegisteredUsers = true;
   protected $btCacheBlockOutputLifetime = 60*30; // 30 minutes

There are a number of variables starting with btCache. All of them are related to the new cache functionality of concrete5. They let you specify if the content changes once a user is logged in ($btCacheBlockOutputForRegisteredUsers) they let you tell concrete5 if the content stays the same if the page is opened using the POST method allowing the cache to be enabled during a form post too ($btCacheBlockOutputOnPost).

You probably won’t be able to measure a huge impact if you’re block doesn’t have to process lots of data in order to print the output. But if there’s a complex method in the background of your block you can use these variables to easily control the cache of the output making your site feel faster.


Concrete5 Beginner’s Guide

Concrete5 Beginner's Guide No posts for quite some time on this blog! I don’t have a new tutorial at the moment, but I still have an explanation and something exciting to tell you!

Some of you guys sent me messages telling me that they wish I’d still be as active in the Concrete5 community as I was a while ago. I was really great to hear that, it’s always good to know that someone appreciates your work. However, truth is, I’m still quite active, just not so much in the forums – there’s a good reason or two for that!

First, I have been rather busy doing Oracle and ERP related work which has nothing to do with Concrete5 at all. However, I’ve been spending quite a few evenings, nights and weekends working on a huge tutorial about Concrete5, more like a “book”! I was contacted by Packt Publishing in June and stared writing shortly after that. I’m currently working on the drafts of the last chapters, I’ll then go through the reviews and after that the people are Packt are going to make sure that everything looks and reads smoothly. However, you can already get access to the first chapters because the book has been accepted as a RAW book, just have a look at https://www.packtpub.com/create-and-customize-your-own-website-with-concrete5-beginners-guide/book. You’ll get access to each chapter as it gets written in an unfinished state.

The book is aimed for people knowing web technologies like PHP, JavaScript, HTML and CSS but without Concrete5 experience. It starts rather easy, for some of you too easy I assume but different readers, different skills. It the continues with a custom theme and lots of custom templates for some Concrete5 core blocks. We then look at building blocks, packages and a simple dashboard extension which allows you to have a look and modify your files on the server. Making it easier (and a bit dangerous) to quickly modify your Concrete5 configuration or theme files if you’re out on business without having the FTP credentials with you.

I hope you like it! The final and printed book is expected to be available in April!

Writing a Book

A few words about my experience writing a book. First of all, I had quite a few doubts, especially since English is not exactly my first language. I knew that I could explain myself in English in a way most people understand what I’m trying to say but still.. The people at Packt convinced me that this is not going to be a problem, especially since you never write a book which gets printed without having someone else having a look at it.

After my first doubts, things started very quickly and have gotten a bit stressful from time to time. There’s a deadline for each chapter to assure that everyone involved in the project is able to do their part in time. Working on a book like I do isn’t a fulltime job, for most authors at Packt it’s an evening and weekend job. This makes it sometimes a bit hard to meet all the deadlines with the result that things can be a bit stressful, especially if some unexpected things happen, at work or in your personal life. Nonetheless, I think it’s absolutely worth the effort, the imagination of finding your own book in your postbox or your favorite bookstore is awesome and drives you to keep working on the book.

Having a tight deadline for every chapter can also be really helpful, especially if you’re a bit like me. Whatever I do, I’d like to spend as much time on it as possible to get the best result possible. It also doesn’t happen very often that I think something is perfect… No matter what I do, having a limited amount of time is beneficial. Whenver I wrote a tutorial I told someone that it’s going to be online the next day and it usually was. Being on time is rather important, probably a disease I’ve got due to the fact that I’m Swiss. It’s pretty much the same with the book, you start writing on a chapter and the closer you get to meet the deadline, the more stressful things are but you feel reliefed once you’ve sent the mail, even if you don’t think your work’s as good as it should be.

If you ever get the chance to write a book, make sure you like writing, make sure you have some time or be prepared to sleep less 😉 It’s a great experience!


Concrete5 – Using TinyMCE Templates

The Concrete5 content block uses TinyMCE as its WYSIWYG editor. Thanks to this decision, we are able to use several plugins most Concrete5 users haven’t thought about.

One feature I really like is the “template” plugin which allows you to create html snippets which you can insert into the content block. In this tutorial I’m going to show you, how you can create a simple 2 and 3 column table template.

TinyMCE Configuration

You’ll find almost anything you have to know on this page: http://wiki.moxiecode.com/index.php/TinyMCE:Plugins/template. But luckily for you, I’m going to make this even easier for you.

First, you have to go to the Dashboard – Sitewide Settings. In the bottom right corner, you can activate a “Custom” configuration for the rich text editor. Once you’ve enabled it, it will show you some options. What do we need to activate the TinyMCE templates:

  • We have to load the template plugin
  • There must be a button to display the template dialog
  • We have to create at least one template
theme : "concrete", 
plugins: "inlinepopups,spellchecker,safari,advlink,template",
editor_selector : "ccm-advanced-editor",
spellchecker_languages : "+English=en",	
theme_concrete_buttons1 : "template,|,bold,italic,underline,strikethrough,|,justifyleft,justifycenter,justifyright,justifyfull,|,hr,|,styleselect,formatselect,fontsizeselect",
theme_concrete_buttons2 : "bullist,numlist,|,outdent,indent,|,undo,redo,|,link,unlink,anchor,image,cleanup,help,code,forecolor",
theme_concrete_blockformats : "p,address,pre,h1,h2,h3,div,blockquote,cite",
theme_concrete_toolbar_align : "left",
theme_concrete_fonts : "Andale Mono=andale mono,times;Arial=arial,helvetica,sans-serif;Arial Black=arial black,avant garde;Book Antiqua=book antiqua,palatino;Comic Sans MS=comic sans ms,sans-serif;Courier New=courier new,courier;Georgia=georgia,palatino;Helvetica=helvetica;Impact=impact,chicago;Symbol=symbol;Tahoma=tahoma,arial,helvetica,sans-serif;Terminal=terminal,monaco;Times New Roman=times new roman,times;Trebuchet MS=trebuchet ms,geneva;Verdana=verdana,geneva;Webdings=webdings;Wingdings=wingdings,zapf dingbats",
theme_concrete_font_sizes : "1,2,3,4,5,6,7",
theme_concrete_styles: "Note=ccm-note",
spellchecker_languages : "+English=en",
template_templates : [
	{
		title : "2 Columns",
		src : "themes/yourTheme/templates/2_columns.html",
		description : "Adds a 2 columns table"
	},
	{
		title : "3 Columns",
		src : "themes/yourTheme/templates/3_columns.html",
		description : "Adds a 3 columns table"
	}
]

There’s one thing you probably have to change. In the two templates I’ve added, there’s a hardcoded path which won’t work on your site. Make sure it points to an existing directory. The content of the html file is rather simple. I modified the example for TinyMCE to make it look like this:

<!-- This will not be inserted -->
<div class="mceTmpl">
<table width="98%" border="1" cellspacing="0" cellpadding="0">
<tr>
<th scope="col">HEADER 1</th>
<th scope="col">HEADER 2</th>
</tr>
<tr>
<td>Sample Data</td>
</tr>
</table>
</div>

How you can insert an HTML snippet

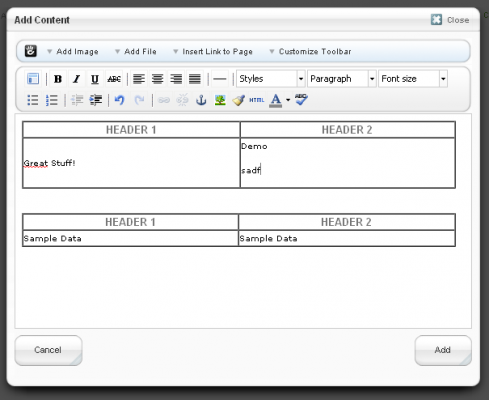
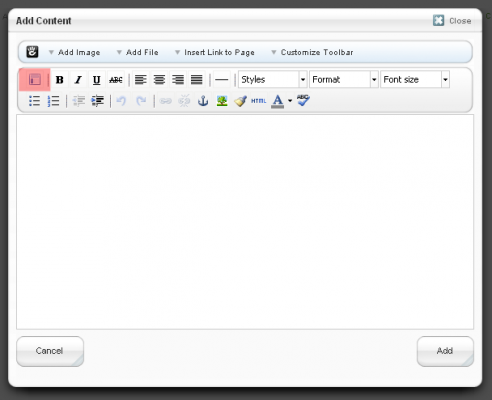
You’re already done, but where can you find the snippets? We you add a new content block, you’ll see a new button:

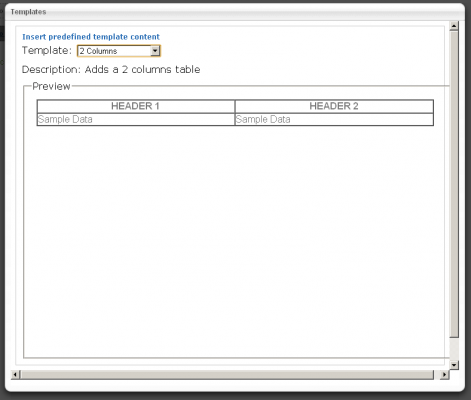
When you click on this button, you’ll see a dialog where you can select the template:

Unfortunately, the insert button is a bit hidden, you have to scroll down to insert the template. You can insert as many snippets into one content block as you want:

I hope you like it and thanks for completely reading this tutorial!


Concrete5 – Custom 404 page

It hopefullly doesn’t happen very often but sometimes a user might enter an address which doesn’t exist. In most situations a simple page is displayed, telling him that the page doesn’t exist. Having some more detailled information can be very helpful, especially when you just relaunched your website. Google & Co need a while to reindex your page and users will probably see “page not found” more frequently than usually.

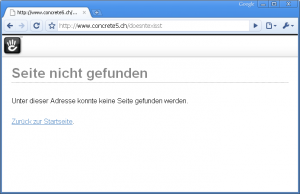
Concrete5 allows you to customize this page but it needs a few modifications. Some of them are probably a bit hard to find – which is why I wrote this tutorial. The standard Concrete5 “page not found” page looks like this:

pagenotfound


Image Navigation Items

It’s been a while since I’ve posted the last tutorial. Due to some unexpected events I finally found some time to write a new one.

The default autonav Block in Concrete5 allows you to add a navigation/menu to your site in almost no time. But as soon as you want to use images it get a bit more difficult. In this tutorial I’m going to show you, how you can specify pictures for each page and pull them in an autonav template.


Expand/Collapse Block

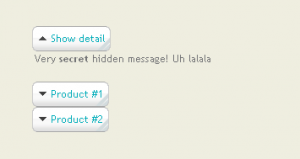
Due to limited time I wasn’t able to write new articles for codeblog. This time there’s not going to be much text, just a free block which you can use for your site.

expand


Concrete5 – Formular Layout anpassen

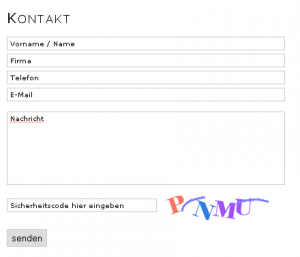
Concrete5 has a nice form block which allows you to create a contact form within a few seconds. You don’t even need to have any html or php skills to create a simple file upload form. Unfortunately this block isn’t very easy to style. It uses some html markup which makes it a bit tricky to use CSS. However, it doesn’t mean it’s impossible! I’m going to show you how you can easily create a styles form using Concrete5 Custom Templates to produce this:

Styles Form


Concrete5 – more Speed with eAccelerator

UPDATE: The latest eAccelerator version doens’t contain the PHP API anymore. It therefore does no longer work with Concrete5! The upcoming version 5.4 is going to have support for APC and memcache. Sorry!

You want more speed with Concrete5? Make sure you’re using eAccelerator!

In this tutorial I’ll explain how to install eAccelerator on a Debian Linux Server.

eaccelerator1


Concrete5 – Staff listing with two Columns

Sometimes content should be presented in two columns. In this tutorial I’ll describe a possible solution that included a very simple block to display a staff/team member with a description on the right side of it. The result will look like this:

staff1