Concrete5 Navigation mit Bildern – der autonav Block erlaubt es sehr einfach und schnell eine hierarchische Seitenstruktur zur Navigation einzufügen. Sollen jedoch nicht Text-Links, sondern Bilder angeklickt werden, braucht es etwas mehr Arbeit.
In diesem Tutorial werde ich ein “Custom Template” für den autonav Block erstellen, welches ein Attribut von einer Seite ausliest um ein Bild anstelle des Textes anzuzeigen.
Seiten Attribute
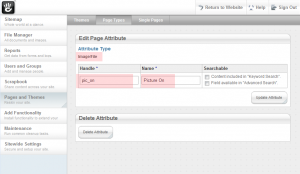
Mit Concrete5 können verschiedene Attribute einer Seite hinzugefügt werden. Damit kann man Meta-Tags, Notizen, Tags, Thumbnails oder eben auch Bilder für die Navigation verwalten. Als erstes müssen wir zwei neue Attribute erstellen. Eines wo wir das Bild auswählen können, wenn die Seite inaktiv ist und eines wenn die Seite aktiv ist.
Die roten Stellen sind entscheidend:
- Typ muss “Image/File” sein
- Das “Handle” ist wichtig, wir benötigen es später im Template
- Der Name ist nur informativ
Bilder zuweisen
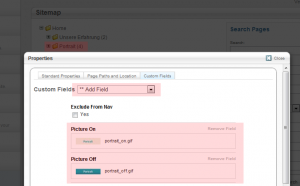
Wir haben nun zwei neue Attribute. Wie auf diesem Screenshot gezeigt, können wir dort Bilder zuweisen:
- In der “Sitemap” die gewünschte Seite suchen und “Properties” auswählen
- Unter “Custom Fields” können wir nun die beiden Felder für diese Seite aktivieren
- Nun die beiden Bilder für die Navigation auswählen
Das Gleiche bitte nun für alle Seiten machen wo kein Text sondern ein Bild in der Navigation erscheinen soll. Dies ist übrigens etwas das auch ein End-User machen kann. Dank den Seiten-Attributen kann ein End-User sogar Navigationselemente mit grafischem Text selber hinzufügen.
Custom Template für den Autonav Block
Wer mit dem Stichwort “Custom Template” nichts anfangen kann, sollte vermutlich zuerst dieses Tutorial durchlesen: http://www.codeblog.ch/de/2009/03/concrete5-templates/.
Um ein neues Custom Template für den Autonav Block anzulegen, können wir ganz einfach von dieser Datei /concrete/blocks/autonav/view.php eine Kopie hier ablegen: /blocks/autonav/templates/image_navigation.php. Die Verzeichnisse autonav und templates müssen vermutlich zuerst erstellt werden.
In Zeile 55 sollte dieser Code zu finden sein. Je nach Concrete5 Version kann sich das natürlich ändern.
1 2 3 4 5 6 7 8 9 10 | if ($c->getCollectionID() == $_c->getCollectionID()) { echo(' <li class="nav-selected nav-path-selected"><a class="nav-selected nav-path-selected" href="' . $pageLink . '">' . $ni->getName() . '</a>'); } elseif ( in_array($_c->getCollectionID(),$selectedPathCIDs) ) { echo(' <li class="nav-path-selected"><a class="nav-path-selected" href="' . $pageLink . '">' . $ni->getName() . '</a>'); } else { echo(' <li><a href="' . $pageLink . '">' . $ni->getName() . '</a>'); } |
Mit etwas HTML und PHP Kenntnissen erkennen wir bereits wo der Link-Text ausgegeben wird. $ni->getName(). Dies ist auch die Stelle wo wir nun ein Bild, falls vorhanden, ausgeben wollen.
Wir ersetzen $ni->getName() also mit Variablen und prüfen vorgängig ob das Seiten-Attribut einen Wert hat und weisen anschliessend ein img-Tag zu.
1 2 3 4 5 6 7 8 9 10 11 12 13 14 15 16 17 18 19 20 21 22 23 | $linkTextActive = $ni->getName(); $linkTextInactive = $ni->getName(); $picOn = $_c->getAttribute('pic_on'); $picOff = $_c->getAttribute('pic_off'); if ($picOn) { $linkTextActive = '<img src="' . $picOn->getURL() . '" alt="' . linkTextActive . '"/>'; } if ($picOff) { $linkTextInactive = '<img src="' . $picOff->getURL() . '" alt="' . linkTextInactive . '"/>'; } if ($c->getCollectionID() == $_c->getCollectionID()) { echo(' <li class="nav-selected nav-path-selected"><a class="nav-selected nav-path-selected" href="' . $pageLink . '">' . $linkTextActive . '</a>'); } elseif ( in_array($_c->getCollectionID(),$selectedPathCIDs) ) { echo(' <li class="nav-path-selected"><a class="nav-path-selected" href="' . $pageLink . '">' . $linkTextActive . '</a>'); } else { echo(' <li><a href="' . $pageLink . '">' . $linkTextInactive . '</a>'); } |
- Line 1,2: Die neuen Variablen
- Line 4,5: Attribut-Wert auslesen
- Line 7-12: Prüft ob das Attribut einen Wert hat und generiert das img-Tag
Jetzt kann ein autonav Block eingefügt werden, alle Einstellungen vornehmen und nachdem der Block hinzugefügt wurde, erneut anklicken und “Set Custom Template” wählen. Hier sollte nun unser neues Custom Template erscheinen.
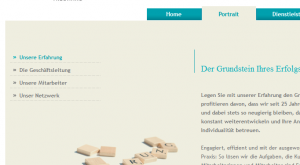
Wenn alles funktioniert hat, sollte nun eine Navigation mit Bildern erscheinen:


63 Comments
Sorry Alan, I thought you do have a development background. Most visitors here do.. cID is the internal page ID, home has the number 1.
You can use this information to add some code in view.php but you’ll need to understand the concept of the autonav block. That’s nothing I can explain in just two lines of code. I’ll see what I can do, but give me a few days, there’s already a ton of work on my desk!
Works perfectly after giving your code links, youre great!
But…. one last question….
Is there a way to have the best of both, image AND text links?
Cheers again
I have got to the point of adding $ni->getName() to the links
Problem is im getting two links when there isnt a imagge associated to the page attributes of pic_on and pic_off
Hi Remo,
Any news on the help you referred to on the 26th of March. Sorry but I didn’t know how else to reference it.
Cheers,
Alan.
It looks like the original autonav block template I took to create my own template has been changed in one of the concrete5 versions released after I wrote my tutorial.
The last code box on line 17 should probably look like this:
Fatal error: Call to a member function getCollectionID() on a non-object in /home/sites/rootsearthworksandlandscaping.co.uk/public_html/concrete/blocks/autonav/templates/Nav.php on line 17
Line 17 can’t be the line I’ve mentioned in your template, it would have to be below that! I also can’t see how this should happen as getCollectionID was already in the code before, now it’s just used twice!
Is it possible that you completely replaced the content of view.php and not just the part mentioned in my tutorial?
I came across your tutorial after having already downloaded the Kino’s Image Menu add-on, which works at first for what I am trying to do but in the end I am facing problems. I am trying to setup a autonav drop down menu, which I have used your Concrete5 – Drop Down Auto-Nav Menu in the past, but I need to use images for the top level items. While the Kino’s Image Menu add-on lets me use images for each menu item on the top level, I am not able to apply your css drop down menu as both require the use of custom templates. So I wanted to find out if there is an easy way to combine the Image Navigation Items and Concrete5 – Drop Down Auto-Nav Menu custom templates you created.
Well, it depends I’d say. If you understand the PHP code, you should be able to combine this thing with something I described here http://www.codeblog.ch/2011/12/concrete5-sooperfish-drop-down-navigation/ But you’d need some coding experience! There’s not much I can do with just a few sentences to help you though!
That CSS dropdown menu you’ve described might be nice because it doesn’t depend on JavaScript, but it does have its limitation and it’s also rather complicated with all that markup to keep Internet Explorer happy. Why don’t you try to combine it with the script I’ve mentioned above. If it doesn’t work, post the code you’ve got and I’ll have a look at it!
I actually able to take the sooperfish drop down you mentioned above and use it as a autonav block for the kino image menu package. And then just need to style it which probably took the longest.
Thanks for all the help.
Something went wrong with this navigation after my update to 5.6.1.2. Were there structural changes that could have affected it do you know? What happens is the url’s are not added into the page, although they show up properly in the auto-nav preview. Thanks for any help you can give on this. I reverted back to the older version on C5 for now.
Hi Nathan, the autonav view has changed quite a bit but I don’t see any reasons why this template shouldn’t work anymore. However, as mentioned in another comment, I don’t recommend to use it. While a pure css solution is nice, it’s a bit hacky and doesn’t give you much flexibility. Have you seen my other tutorial which uses SooperFish http://www.codeblog.ch/2011/12/concrete5-sooperfish-drop-down-navigation/ ?
Thanks Remo. I’ve been toying with the possibility of changing to something like that so maybe now it the time to do it. I was kind of hoping to have something a little flashier like http://www.cssplay.co.uk/menus/pro_drop7.html#nogo32 but maybe I can adapt this to look kind of like that with CSS. CSS play also has options that enable inclusion of an image which would be nice, but not sure it’s worth the effort…