It’s been a while since I’ve posted the last tutorial. Due to some unexpected events I finally found some time to write a new one.
The default autonav Block in Concrete5 allows you to add a navigation/menu to your site in almost no time. But as soon as you want to use images it get a bit more difficult. In this tutorial I’m going to show you, how you can specify pictures for each page and pull them in an autonav template.
Page attributes
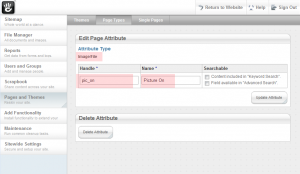
Concrete5 allows you do add different kinds of attributes to your page. You can use them to manage meta tags, tags, notes, thumbnails or images for your navigation. First we have to create two new page attributes where we can select the pictures. One which will be shown if the page is currently active and one for inactive pages.
All the important information has a red overlay:
- Attribute type must be Image/File
- The Handle is used in the template, make sure you remember it
- The Name is just a description to explain what the use of the attribute is
Assign images
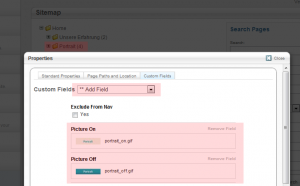
We have two new attributes where we can assign some images. The following screenshot explains this:
- In the sitemap, open “Properties” for the page where you would like to see an image in the navigation
- Go to the last tab “Custom Fields” and add the two fields you just created
- Select the image you want to see if the page is active and inactive
Do this for all the pages where you’d like to have an image instead of a text link. You can always add and modify the images for the pages. Even your end-user can add new image menu item this way. One of many reasons why page attributes are so powerful!
Custom Autonav Template
If you haven’t worked with custom template you should probably read this tutorial first: http://www.codeblog.ch/2009/03/concrete5-templates/.
To create a new custom template, simply copy /concrete/blocks/autonav/view.php to /blocks/autonav/templates/image_navigation.php. You probably have to create the folders autonav and templates first.
Around line 55 you should see this code (might be different, depending on your c5 version:
1 2 3 4 5 6 7 8 9 10 | if ($c->getCollectionID() == $_c->getCollectionID()) { echo(' <li class="nav-selected nav-path-selected"><a class="nav-selected nav-path-selected" href="' . $pageLink . '">' . $ni->getName() . '</a>'); } elseif ( in_array($_c->getCollectionID(),$selectedPathCIDs) ) { echo(' <li class="nav-path-selected"><a class="nav-path-selected" href="' . $pageLink . '">' . $ni->getName() . '</a>'); } else { echo(' <li><a href="' . $pageLink . '">' . $ni->getName() . '</a>'); } |
With some HTML and PHP knowledge you probably have already found the place which outputs the link text. It’s of course “$ni->getName()”. This is the code which we have to modify to display images if they’ve been selected.
We replace $ni->getName() with variables which will hold the html code for the image or the link text:
1 2 3 4 5 6 7 8 9 10 11 12 13 14 15 16 17 18 19 20 21 22 23 | $linkTextActive = $ni->getName(); $linkTextInactive = $ni->getName(); $picOn = $_c->getAttribute('pic_on'); $picOff = $_c->getAttribute('pic_off'); if ($picOn) { $linkTextActive = '<img src="' . $picOn->getURL() . '" alt="' . linkTextActive . '"/>'; } if ($picOff) { $linkTextInactive = '<img src="' . $picOff->getURL() . '" alt="' . linkTextInactive . '"/>'; } if ($c->getCollectionID() == $_c->getCollectionID()) { echo(' <li class="nav-selected nav-path-selected"><a class="nav-selected nav-path-selected" href="' . $pageLink . '">' . $linkTextActive . '</a>'); } elseif ( in_array($_c->getCollectionID(),$selectedPathCIDs) ) { echo(' <li class="nav-path-selected"><a class="nav-path-selected" href="' . $pageLink . '">' . $linkTextActive . '</a>'); } else { echo(' <li><a href="' . $pageLink . '">' . $linkTextInactive . '</a>'); } |
- Line 1,2: The new variables
- Line 4,5: Get the attribute values – the image
- Line 7-12: Checks if the attribute has a value and replaces the link text
Now you can add an autonav block, set all the properties and after you’ve added the block, click on it again an hit “Set Custom Template”. If you create our custom template in the correct folder, you should now be able to select it.
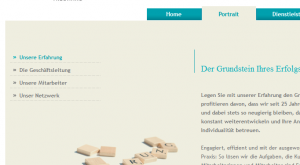
If everything worked you should now have a top navigation like this:


63 Comments
Sorry Alan, I thought you do have a development background. Most visitors here do.. cID is the internal page ID, home has the number 1.
You can use this information to add some code in view.php but you’ll need to understand the concept of the autonav block. That’s nothing I can explain in just two lines of code. I’ll see what I can do, but give me a few days, there’s already a ton of work on my desk!
Works perfectly after giving your code links, youre great!
But…. one last question….
Is there a way to have the best of both, image AND text links?
Cheers again
I have got to the point of adding $ni->getName() to the links
Problem is im getting two links when there isnt a imagge associated to the page attributes of pic_on and pic_off
Hi Remo,
Any news on the help you referred to on the 26th of March. Sorry but I didn’t know how else to reference it.
Cheers,
Alan.
It looks like the original autonav block template I took to create my own template has been changed in one of the concrete5 versions released after I wrote my tutorial.
The last code box on line 17 should probably look like this:
Fatal error: Call to a member function getCollectionID() on a non-object in /home/sites/rootsearthworksandlandscaping.co.uk/public_html/concrete/blocks/autonav/templates/Nav.php on line 17
Line 17 can’t be the line I’ve mentioned in your template, it would have to be below that! I also can’t see how this should happen as getCollectionID was already in the code before, now it’s just used twice!
Is it possible that you completely replaced the content of view.php and not just the part mentioned in my tutorial?
I came across your tutorial after having already downloaded the Kino’s Image Menu add-on, which works at first for what I am trying to do but in the end I am facing problems. I am trying to setup a autonav drop down menu, which I have used your Concrete5 – Drop Down Auto-Nav Menu in the past, but I need to use images for the top level items. While the Kino’s Image Menu add-on lets me use images for each menu item on the top level, I am not able to apply your css drop down menu as both require the use of custom templates. So I wanted to find out if there is an easy way to combine the Image Navigation Items and Concrete5 – Drop Down Auto-Nav Menu custom templates you created.
Well, it depends I’d say. If you understand the PHP code, you should be able to combine this thing with something I described here http://www.codeblog.ch/2011/12/concrete5-sooperfish-drop-down-navigation/ But you’d need some coding experience! There’s not much I can do with just a few sentences to help you though!
That CSS dropdown menu you’ve described might be nice because it doesn’t depend on JavaScript, but it does have its limitation and it’s also rather complicated with all that markup to keep Internet Explorer happy. Why don’t you try to combine it with the script I’ve mentioned above. If it doesn’t work, post the code you’ve got and I’ll have a look at it!
I actually able to take the sooperfish drop down you mentioned above and use it as a autonav block for the kino image menu package. And then just need to style it which probably took the longest.
Thanks for all the help.
Something went wrong with this navigation after my update to 5.6.1.2. Were there structural changes that could have affected it do you know? What happens is the url’s are not added into the page, although they show up properly in the auto-nav preview. Thanks for any help you can give on this. I reverted back to the older version on C5 for now.
Hi Nathan, the autonav view has changed quite a bit but I don’t see any reasons why this template shouldn’t work anymore. However, as mentioned in another comment, I don’t recommend to use it. While a pure css solution is nice, it’s a bit hacky and doesn’t give you much flexibility. Have you seen my other tutorial which uses SooperFish http://www.codeblog.ch/2011/12/concrete5-sooperfish-drop-down-navigation/ ?
Thanks Remo. I’ve been toying with the possibility of changing to something like that so maybe now it the time to do it. I was kind of hoping to have something a little flashier like http://www.cssplay.co.uk/menus/pro_drop7.html#nogo32 but maybe I can adapt this to look kind of like that with CSS. CSS play also has options that enable inclusion of an image which would be nice, but not sure it’s worth the effort…