Auto-Nav Template
In diesem Tutorial http://www.codeblog.ch/2009/03/concrete5-templates/ hab ich erkärt, wie man einen “Page-List” Block erweitern kann, um ein Thumbnail anzuzeigen. Der Ablauf ist wiedrrum der gleiche.
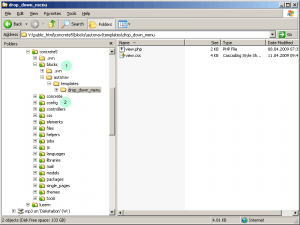
Wir erstellen ein paar Verzeichnisse. Innerhalb “blocks” sind folgende Verzeichnisse anzulegen: “autonav/templates/drop_down_menu”
Bitte beachten, dass im Ordner “concrete” nochmals ein Ordner “blocks” existiert, markiert mit der Nummer 2. Dieser Ordner gehört zum sogennanten “Concrete5 Core”, darin bitte nichts verändern!
Dieses Tutorial verwendet das CSS Menü von Stu Nichols, welches ihr hier findet könnt: http://www.cssplay.co.uk/menus/final_drop.html. Es funktioniert mit zahlreichen Browsern und benötigt keine einzige Zeile JavaScript!
Als erstes erstellen wir eine Datei mit dem Namen view.css:
1 2 3 4 5 6 7 8 9 10 11 12 13 14 15 16 17 18 19 20 21 22 23 24 25 26 27 28 29 30 31 32 33 34 35 36 37 38 39 40 41 42 43 44 45 46 47 48 49 50 51 52 53 54 55 56 57 58 59 60 61 62 63 | /* ================================================================ This copyright notice must be untouched at all times. The original version of this stylesheet and the associated (x)html is available at http://www.cssplay.co.uk/menus/final_drop.html Copyright (c) 2005-2008 Stu Nicholls. All rights reserved. This stylesheet and the associated (x)html may be modified in any way to fit your requirements. =================================================================== */ .menu {width:745px; height:32px; position:relative; z-index:100;font-family:arial, sans-serif;} /* hack to correct IE5.5 faulty box model */ * html .menu {width:746px; w\idth:745px;} /* remove all the bullets, borders and padding from the default list styling */ .menu ul {padding:0;margin:0;list-style-type:none;} .menu ul ul {width:149px;} /* float the list to make it horizontal and a relative positon so that you can control the dropdown menu positon */ .menu li {float:left;width:149px;position:relative;} /* style the links for the top level */ .menu a, .menu a:visited {display:block;font-size:12px;text-decoration:none; color:#fff; width:138px; height:30px; background:#09c; padding-left:10px; line-height:29px; font-weight:bold;} /* a hack so that IE5.5 faulty box model is corrected */ * html .menu a, * html .menu a:visited {width:149px; w\idth:138px;} /* style the second level background */ .menu ul ul a.drop, .menu ul ul a.drop:visited {background:#d4d8bd url(http://www.cssplay.co.uk/menus/breadcrumbs/grey-arrow.gif) no-repeat 130px center;} /* style the second level hover */ .menu ul ul a.drop:hover{background:#c9ba65 url(http://www.cssplay.co.uk/menus/breadcrumbs/blue-arrow.gif) no-repeat 130px center;} .menu ul ul :hover > a.drop {background:#c9ba65 url(http://www.cssplay.co.uk/menus/breadcrumbs/blue-arrow.gif) no-repeat 130px center;} /* style the third level background */ .menu ul ul ul a, .menu ul ul ul a:visited {background:#e2dfa8;} /* style the third level hover */ .menu ul ul ul a:hover {background:#b2ab9b;} /* hide the sub levels and give them a positon absolute so that they take up no room */ .menu ul ul {visibility:hidden;position:absolute;height:0;top:31px;left:0; width:149px;} /* another hack for IE5.5 */ * html .menu ul ul {top:30px;t\op:31px;} /* position the third level flyout menu */ .menu ul ul ul{left:149px; top:-1px; width:149px;} /* position the third level flyout menu for a left flyout */ .menu ul ul ul.left {left:-149px;} /* style the table so that it takes no ppart in the layout - required for IE to work */ .menu table {position:absolute; top:0; left:0; border-collapse:collapse;;} /* style the second level links */ .menu ul ul a, .menu ul ul a:visited {background:#d4d8bd; color:#000; height:auto; line-height:1em; padding:5px 10px; width:128px;} /* yet another hack for IE5.5 */ * html .menu ul ul a, * html .menu ul ul a:visited {width:150px;w\idth:128px;} /* style the top level hover */ .menu a:hover, .menu ul ul a:hover{color:#000; background:#b7d186;} .menu :hover > a, .menu ul ul :hover > a {color:#000; background:#b7d186;} /* make the second level visible when hover on first level list OR link */ .menu ul li:hover ul, .menu ul a:hover ul{visibility:visible; } /* keep the third level hidden when you hover on first level list OR link */ .menu ul :hover ul ul{visibility:hidden;} /* make the third level visible when you hover over second level list OR link */ .menu ul :hover ul :hover ul{ visibility:visible;} |
Ich hab ein paar Modifikationen gemacht, diese sind aber nicht erforderlich. Stu Nichols erlaubt es, das CSS nach eigenen Wünschen zu verändern, solange die Notiz zu Beginn der CSS Datei nicht entfernt wird.
Als nächstes brauchen wir ein paar Zeilen PHP Code um die HTML Struktur zu erstellen. Im Allgmeinen ist es am einfachsten, die bestehende Ansicht eines Blocks zu kopieren. In diesem Fall wäre dies “concrete/blocks/autonav/view.php”. Ihr könnt aber auch den folgenden Code kopieren und in der Datei view.php im Verzeichnis drop_down_menu abspeichern:
1 2 3 4 5 6 7 8 9 10 11 12 13 14 15 16 17 18 19 20 21 22 23 24 25 26 27 28 29 30 31 32 33 34 35 36 37 38 39 40 41 42 43 44 45 46 47 48 49 50 51 52 53 54 55 56 57 58 59 60 61 62 63 64 65 66 67 68 69 70 71 72 73 74 75 76 77 | <?php defined('C5_EXECUTE') or die(_("Access Denied.")); $aBlocks = $controller->generateNav(); global $c; if ($c->isEditMode()) { echo(" <div class=\"menu\" style=\"position:inherit!important;\"> <ul>"); } else { echo(" <div class=\"menu\"> <ul>"); } $nh = Loader::helper('navigation'); foreach($aBlocks as $ni) { $_c = $ni->getCollectionObject(); if (!$_c->getCollectionAttributeValue('exclude_nav')) { $thisLevel = $ni->getLevel(); if ($thisLevel > $lastLevel) { echo("<!--[if IE 7]><!--></a><!--<![endif]-->\n<!--[if lte IE 6]> <table> <tr> <td><![endif]-->\n <ul>\n"); } else if ($thisLevel < $lastLevel) { for ($j = $thisLevel; $j < $lastLevel; $j++) { echo("</a></li> \n</ul> \n<!--[if lte IE 6]></td> </tr> </table> </a><![endif]--></li> \n"); } } if ($thisLevel == $lastLevel && $i >0) { echo "</a></li> \n"; } $pageLink = false; if ($_c->getCollectionAttributeValue('replace_link_with_first_in_nav')) { $subPage = $_c->getFirstChild(); if ($subPage instanceof Page) { $pageLink = $nh->getLinkToCollection($subPage); } } if (!$pageLink) { $pageLink = $ni->getURL(); } echo ' <li><a href="'.$pageLink.'">' . $ni->getName(); $lastLevel = $thisLevel; $i++; } } $thisLevel = 0; for ($i = $thisLevel; $i <= $lastLevel; $i++) { echo("</a></li> </ul> "); } echo '</div> '; ?> |
Das Ergebnis
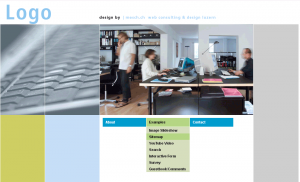
Jetzt haben wir unser Template erstellt, wir klicken nochmals auf unsere unschön formatierte Navigation, wählen “Set Custom Template” und finden dort unser Template. Auswählen und Speichern and schon haben wir ein Menü wie dieses:
Sämtliche Files (Theme & Auto-Nav Template) können hier heruntergelanden werden: Theme + Auto-Nav Template
Einfach in euer Concrete5 Verzeichnis entpacken, sämtliche Verzeichnisse und Dateien werden automatisch erstellt!


67 Comments
Just look through sooperfish-theme-black.css (or whatever css you’ve copied) and replace the colours!
Can you please comment to the right post (http://www.codeblog.ch/2011/12/concrete5-sooperfish-drop-down-navigation/)? thanks!
I really need help, need to finish this website today and still cant seem to get the menu working properly
Hi there, first I would like to thank for all the work sharing this info withou profit! People like you make the world a better place!
Second: I have an old javascript menu, in http://www.luzesom.pt that is “pull-right-side”. Can this be changed to do that, when I upgrade to C5?
Hi Pedro,
thanks, I’m glad I was able to offer your some free information!
I haven’t seen a menu which I couldn’t convert to concrete5 but depending on the structure and complexity it might take more or less time.
The menu on your site uses a pretty old fashioned structure based on tables. I wouldn’t recommend to convert that menu to concrete5 but rather create a new one.
But you’ll certainly need some time and developer skills!
Remo
Hi,
Please see my website. This template gets applied but for some reason it does not appear correctly.
Thank you so much for this.
I’m not really sure what you mean by “does not appear correctly”. I can see that your navigation doesn’t work well because there’s a gap between the horizontal menu button and the sub items. This is because you’ve got a margin-top: 14px applied to “div#main-container #header ul”. I’d recommend to change that, but beside that, I can’t see any issues!
Hi Remo,
I am a newbee with C5.
I have added your files to display a dropdown menu. I have created two subpages for the page innovation. But the subpages are not displayed.
Can you help me ? That would be nice. Thank you.
Frank
It sounds like you didn’t select “Display all” in this screen:
http://www.codeblog.ch/wp-content/uploads/2009/04/2-add-auto-nav.png
By the way: There’s another (newer) tutorial about drop down navigation: http://www.codeblog.ch/2011/12/concrete5-sooperfish-drop-down-navigation/
Hi Remo,
thank you very much for your quick answer. In the meantime I included the Auto-Nav into another page (http://www.naturschallwandler-lautsprecher-beschallung.de/c5/index.php?cID=74) in the content-area and there the submenu items are displayed. Because there is more space for them, I guess. Do you have an idea how I get it properly running in the nav-bar ?
Frank
Hi Remo,
now it is running. Thank you again. I have changed the setting “Unterseiten Ebenen” to “alle anzeigen”. I have to think about these options 🙂
Frank
Great!
Hi,
I’ve added a border-left: 1px style to the menu bar. I wanted to have a divider in between menu items. The problem is I can’t seem to remove the left border for the first menu item. I’ve tried .menu li.first {border: none;} but nothing happens. Has anyone been successful with this?
I don’t think there’s a class called first, at least I can’t seem to see one. You either have to update the PHP script to add a first class or use :first-child instead of .first.
Hi Remo,
Thanks for this. I just have a small issue, in my website the template shows up perfect except there is a black empty space beside the drop down. Is this normal, and is there a way to get rid of it?
Hi Paul, any reason why you aren’t using the more modern Sooperfish tutorial? http://www.codeblog.ch/2011/12/concrete5-sooperfish-drop-down-navigation/
Hi,
I am having an issue with the Amiant menu secondary levels disappearing when I go down to click them. Also I can’t seem to get the menu to go to all my pages and I did go to the page types and put the menu in.
I saw that you had some code to install. I am not sure about where I am supposed to be putting code. I am new at this. I have watched a lot of the editing tutorials, but haven’t gotten to all of the tutorials yet.
My webpage is wanderz.us. I do have a complete page up and am working on several more.
I can click the add ons in the blocks, but where and how do I put the code in to fix my drop down issue?
I sure would appreciate it if you could give me some pointers in an easy to understand way for someone without a lot of computer programming knowledge. I can cut and paste with the best of them if I know where and how get there. Thanks.
Wanda
Sorry, I’m not the author of the amiant menu, no clue how it works. You’re probably better off asking the actual author!